Recipes

All posts in the Recipes category

Savoury Sweet Potato Crumble

Published February 4, 2017 by Storm

Cooked this yesterday to share with a friend; mentioned it to another friend and had to promise to share the recipe, so here it is.

I cooked mine in my Dutch oven, so it could go straight from the hob to the oven, but you could start the filling off in a good size saucepan and then transfer it to a casserole dish to bake.

For the filling

1-2 tablespoons sunflower oil

2 smallish or 1 large onion, roughly chopped

2 cloves garlic, crushed

150g chestnut mushrooms, quartered (or cut into six segments if large)

2 large sweet potatoes, cut into 1″ cubes

2 teaspoons caraway seeds

500ml veg’ stock

400g tin chickpeas, drained

For the topping

250g barley flour

125g butter

50g porridge oats

Optional – A couple of handfuls of grated cheese (I used goats’ Gouda)

Method

Heat over to 200ºC

While the oven is coming to temperature, heat the oil over a low to medium heat and sweat the onions and garlic until softened, stirring regularly.

Add the mushrooms and cook for about five minutes, until softening.

Add the sweet potatoes, caraway seeds, and stock; stir well and bring to the boil. Then simmer uncovered for 15 to 20 minutes.

Meanwhile combine the topping ingredients and work between your fingertips until the mixture resembles coarse breadcrumbs.

Stir the chickpeas into the filling.

Drain of any excess liquid (I think I poured about 2 tablespoons away).

Add the crumble topping and bake for around 30 minutes.

If topping with cheese sprinkle it over the top about 5 minutes before the end of the cooking time.


Easy to do a vegan version by replacing the butter with dairy free spread (I like Suma Sunflower Spread for baking) and skipping the cheese.

For a gluten free version I would probably use buckwheat flour.
 

Almost Everything Free Brownies

Published July 3, 2016 by Storm

I was baking brownies to share this weekend and, because we all have different dietary requirements, they needed to be everything free. Well, not everything free, but dairy, gluten, and soya free, and ideally palm oil free as well.
The gluten free need was easily met; if I don’t have time to risk an experiment not being good enough to share or if I just want a quick and easy substitute flour for a recipe that would usually use wheat I fall back on a gluten free flour blend I know I can rely on. Avoiding dairy, soya, and palm with fat that would behave a lot like butter was a more interesting challenge. I decided to try coconut oil. You don’t have to buy expensive virgin coconut oil for these though, there’s no way you’d be making my brownies as part of a health food kick, I used the cheapest I could find and it worked just fine.

I may experiment more with different flours and maybe adding walnuts or chocolate chips but given that these were squidgy yet slightly crumbly, with a thin, crisp top I’m happy with how they turned out, and given how rapidly the pile on the plate went down I think others were happy too.

The recipe

Makes 12-16 brownies

  • 5 oz Dark Chocolate (a bar and a half of the 71% one I like, leaving me some to eat while brownies bake)
  • 3.5 fl oz coconut oil
  • 7 oz granulated sugar
  • 4 oz gluten free plain white flour blend
  • 1 teaspoon baking powder
  • 3 medium eggs

Pre-heat oven to 170ºC fan oven (I think that’s about 190ºC without fan or Gas Mark 5).

Grease and line an 8″ square baking dish or tin.

Melt the chocolate and coconut oil together in a double boiler.

Mix the sugar, flour, and baking powder together in a large bowl.

Beat the eggs and whisk thoroughly into the dry ingredients.

Stir in the chocolate and coconut oil.

(Add any extras you fancy like chopped walnuts or dried cherries at this stage).

Transfer the mix to your baking dish and bake for 20-25 minutes (it should be crisp on top but still slightly soft.

Allow to cool in the baking dish for about 10 minutes before turning out onto a wire rack.

Mixed Seed Loaf with Honey

Published November 4, 2015 by Storm

Darker days see me wanting more comforting food. Nothing beats good bread for comfort food; whether it’s still warm from baking alongside a bowl of soup or a thickly buttered doorstep topped with home-made jam, it’s food for the soul as well as the stomach. This loaf isn’t quite as rich as my Honey and Walnut Loaf but it’s still good autumn fare.

As usual the instructions are for a bread machine, my hands and kneading bread don’t mix well. 

For a medium loaf

  • ¾ teaspoon dried yeast
  • 4 oz barley flour
  • 10 oz strong wholewheat flour
  • ½ oz butter
  • 1 teaspoon salt
  • 1 tablespoon heather honey (it really is worth using heather honey if you can get it)
  • 4 tablespoons sesame seeds
  • 300ml water
  • 3 tablespoons sunflower seeds
  • 2 tablespoons pumpkin seeds

Put all the ingredients except the sunflower and pumpkin seeds in your bread pan, in the order recommended by the manufacturer.

Select the Whole Wheat Raisin setting.

Add the sunflower and pumpkin seeds at the raisin beep.

Bread machine honey and walnut loaf

Published October 25, 2015 by Storm

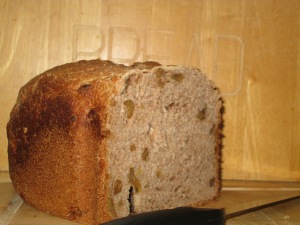
I haven’t baked quite as much this year as last but I have tried to stick to my goal of a different loaf each time I bake. This loaf was an experiment which turned out so nicely I may find myself having to repeat it before the year is out. With a warm, rich flavour from the heather honey I used, this is a comforting loaf for cold, damp days.

IMG_1640

To make a medium loaf

  • ¾ teaspoon dried yeast
  • 10oz strong wholemeal flour
  • 4oz strong white flour
  • ½oz butter
  • 1 teaspoon salt
  • 2 tablespoons honey
  • 280ml water
  • 3oz walnut pieces

Add all the ingredients except the walnuts to the bread pan of your bread machine, in the order specified by the manufacturer.

Select the Whole Wheat Raisin setting.

Add the walnuts at the raisin beep.

Enjoy the aroma that fills your kitchen as the bread bakes, try not to eat it all in one go!

Stuffed Marrow Part 2: The Subtly Spiced One

Published October 17, 2015 by Storm

The second marrow I had to stuff this autumn was enormous; about 18″ long and with much of it’s diameter 6.5″, I knew I was going to need a lot of stuffing.

IMG_1586

I made double quantity of my cheesy, nutty stuffing but it wasn’t enough; about a third of my marrow was still unstuffed. In desperation I trawled my cupboards to see what else I could make a stuffing with, the result was more successful than I had dared to hope. The recipe should give enough stuffing mix for most store bought marrows.

Ingredients

  • 4oz/115g wholemeal breadcrumbs
  • 6oz/170g ground almonds
  • 2 chunky carrots, grated
  • 2 medium eggs, beaten
  • 1 tablespoon fresh or frozen parsley
  • 1 tablespoon fresh or frozen coriander leaf
  • 1 teaspoon fennel seeds
  • 1 teaspoon ground coriander seed

IMG_1621

Technique

Pre-heat oven to 180°C.

Mix all the stuffing ingredients together and set aside.

Slice marrow into 1.5″ to 2″ rounds, scoop out seeds and pith.

Place marrow rounds on a lipped baking tray or in a roasting dish, stuff, bake for about 1 hour.

Stuffed Marrow Part 1: The Cheesy, Nutty One

Published October 16, 2015 by Storm

Marrows seem to be a much neglected vegetable. When I mentioned to people recently that friends had given me two beautiful, and in one case giant, marrows from their garden the typical response was “that’s nice, but what will you do with them?”. I did consider making marrow rum but in the end both got stuffed.

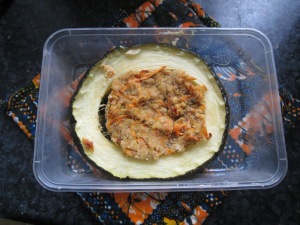
This is the first stuffing I came up with, this was enough for the 7 rounds I got from the first marrow and would be plenty for any of the marrows I’ve seen on sale in supermarkets and greengrocers. I almost forgot to photograph it so the picture shows a leftover slice a little bit squashed to fit in a tub ready to put in the fridge…

IMG_1620

Ingredients

  • 1 average size marrow
  • 8oz/225g mature hard goat cheese, grated 
  • 4oz/115g wholemeal or spelt breadcrumbs
  • 3.5oz/100g chopped roast hazelnuts
  • 4 tablespoons/60ml milk or milk alternative
  • 3 teaspoons dried mixed herbs
  • Freshly ground black pepper to taste

For the cheese I use St Helen’s but there are goats’ cheddars and goudas which would work.

Breadcrumbs; don’t buy dried! Use fresh or do what I do and make a batch in one go when you get a nice stale loaf and freeze them in useful portions.

Milk; personally I’d use a nut milk, macadamia or unsweetened almond for preference.

Technique

Pre-heat oven to 180°C.

Mix all ingredients except the marrow together in a large mixing bowl, it’s easiest just to get your hands into the mix than try to stir it all together with a spoon.

Leaving the stuffing to stand, cut the marrow into 1.5″ to 2″ rounds and scoop out the seeds and pith.

Place the marrow rounds on a lipped baking tray or in a roasting dish, fill with stuffing, bake for about an hour.

Any spare stuffing can be baked in a small pie dish or ramekins.

Apple and pear crumble with almond and star anise

Published September 13, 2015 by Storm

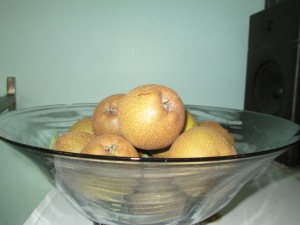
I’m used to the idea of foraging for autumn berries, foraging for orchard fruits is a new one to me! A recent trip on the local canal saw my Dad and I picking pears that were overhanging the water; small, crisp and slightly tart, these were an unexpected bonus to a pleasant day out.

IMG_1570

When a neighbour gave me a bagful of very sweet windfall apples I felt I had the perfect combination for an autumnal crumble. I used my smallest diameter casserole dish, which is 6.5 inches, for an 8 inch casserole dish increase the quantities by 50%.

For the topping:

  • 2 ounces ground almonds
  • 2 ounces plain flour (white or wholemeal)
  • 2 ounces granulated sugar
  • 3 ounces butter (or dairy free spread suitable for baking), cut into small cubes
  • 1 tablespoon flaked almonds

For the filling

  • 3 eating apples
  • 6 small, firm pears
  • 3 tablespoons orange juice
  • 3 star anise

Preheat oven to 160ºC fan or 180ºC conventional.

Make the topping by all the ingredients except the flaked almonds together between your fingers until you achieve your preferred crumble consistency. Set aside.

Core the fruit and chop into roughly ½ inch cubes.

Toss the fruit in the orange juice in your casserole dish. 

Add the star anise, evenly spaced.

Cover the fruit with the crumble topping and sprinkle flaked almonds over the top.

Bake for approx’ 1 hour.

Zingy Blackberry Bake

Published September 11, 2015 by Storm

September has arrived and Autumn is definitely in the air. Terracotta and gold start appearing amongst the greenery and the nights are definitely getting longer. As well as the changing colour of the leaves other colours are hard to miss along the hedgerows, the bright red of haws and rosehips, the dusty purple of sloes, the glossy black of blackberries and elderberries, and the varied hues of orchard fruits. Nature in all it’s bounty, and this year there seems to be a lot of it. A recent walk with friends saw us come home with crab apples, elderberries and blackberries; blackberries being notorious for not keeping I thought I’d better use those first.

This bake sees a thin layer of blackberries flirting with candied orange peel, under a rich yet earthy crumble topping.

For the filling

  • Enough blackberries to cover the base of an 8 inch pie dish (I use the lid of a pyrex casserole dish)
  • 1 tablespoon barley flour*
  • 2 tablespoons granulated sugar
  • 2 teaspoons candied orange peel, fairly finely diced

For the topping

  • 2 ounces barley flour*
  • 2 ounces granulated sugar
  • 1/3 teaspoon ground cinnamon
  • 2 ounces salted butter, cut into small pieces

*I haven’t tested a gluten free version but I think buckwheat flour would be the best alternative to barley flour.

Pre-heat the oven to 190ºC.

Mix the filling ingredients together and spread evenly across the base of your pie dish.

Put all the topping ingredients into a bowl and work between your fingers until you have a chunky crumble topping. Sprinkle evenly over the top of the blackberry mix.

Bake for around half an hour; the topping will be lightly golden and berry juice will be appearing around the edges of the topping when it’s done.

In a perfect world I’d serve this with clotted cream, however no-one seems to make clotted cream from goats’ milk so I made do with double. It would also be good with cinnamon ice-cream.

Obviously you could easily make a vegan version by using a dairy free spread suitable for baking, it would just be a little less rich than the buttery version.

Walnut, garlic and basil bread

Published May 24, 2015 by Storm

The baking experimentation continues; May has seen three loaves baked (so far), with at least one more likely before I summarise them all at the end of the month. This loaf though was so good it deserves it’s own post, and as it was one I dreamt up for myself I can share the recipe.

This was one of those ideas born of what I had in the kitchen and felt I should try throwing together, baking without needing to shop first. I had some walnut pieces I felt needed using up, and walnuts are always good in bread, so that was my starting point. There was a pot of basil on the windowsill, sadly needing replacing now after being eaten by a ginger cat, and I felt that would go well with walnuts. From deciding to use basil it was a short step to pulling the jar of garlic purée out of the fridge, as the two go so well together. Initially I was going to make this a wholemeal loaf but realised I was lacked wholemeal flour so had to use white instead; I think this was a happy accident as I don’t think the finished loaf could be improved on. 

Almost a meal in itself this was a good bread for any non-sweet purpose. Mushroom pate or cheese and salad sandwiches were deliciously satisfying and I’ve never made such tasty eggy-bread before. So, without further ado, here’s the recipe…

For a medium loaf

  • ¾ teaspoon easy bake yeast
  • 14oz strong white flour
  • ½oz butter (use 1 tablespoon sunflower oil for a vegan loaf)
  • 1 teaspoon sugar
  • 1 teaspoon salt
  • 1 teaspoon crushed garlic or garlic purée
  • Approx 12 fresh basil leaves, roughly shredded
  • 280ml water
  • 1½oz walnut pieces

Using the Basic Raisin setting on your bread machine, put all the ingredients except the walnuts into the machine in the order specified by the manufacturer (mine is dry ingredients first, water last but I know some makes reverse this). Add the walnuts at the raisin bleep.

The tricky bit is allowing the bread to cool before tucking into it as it smells so delicious!

Katzenworld

Welcome to the world of cats!

bread and the machine

wonders of bread machine: baking bread and beyond

5 Things I've Learned About...

Life. Learning. Condensed.

The Sweaty Knitter, Weaver and Devotee of Other Fiber Arts

Interweaving life with fiber arts! (Photograph by Carly Moskat.)

Project Awesome

Making my life more awesome

the twisted yarn

Knitting, crochet, running, and silliness.

COOKING ON A BOOTSTRAP

by Jack Monroe, bestselling author of 'A Girl Called Jack'

Chocolate Sheep

a knitting blog with occasional bites of dark chocolate

WordPress.com News

The latest news on WordPress.com and the WordPress community.